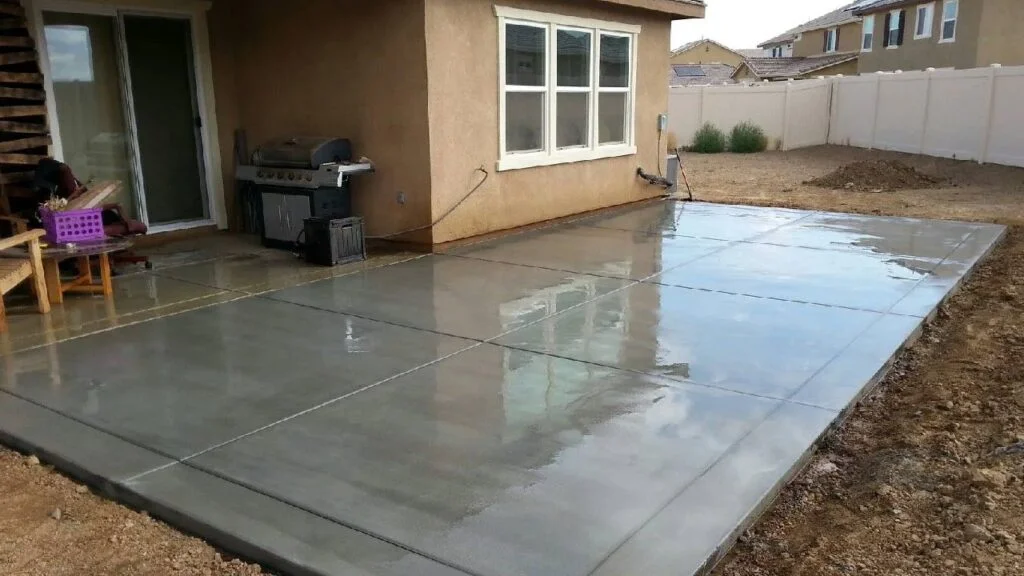
A concrete slab installation is a foundational step in many construction projects, providing a flat, durable surface for various structures like patios, driveways, and even homes. It involves preparing the ground, pouring concrete, and finishing the surface to create a strong base that supports everything from outdoor living spaces to interior wood flooring.
Proper site preparation is essential for a successful installation. This includes checking the soil conditions, compacting the earth, and ensuring good drainage to prevent stress cracks and shifting. For large projects, such as patios or garages, reinforcement with rebar is often required to strengthen the concrete slab.
Concrete slabs are widely used for their versatility. They are ideal for radiant heat systems, adding warmth to floors in winter, and can also serve as a nonslip surface for areas like pool decks or walkways. A well-installed slab ensures longevity and resilience.
Preparing the Site for a Concrete Slab
Checking Building Codes and Permits
Before starting your concrete slab installation, it’s important to check with your local building department to determine whether a building permit is required. These regulations ensure that your installation complies with local codes, which may dictate specific slab thickness, placement, and reinforcement needs. Ensuring compliance will help avoid costly fines and delays. In most cases, obtaining a permit is a quick process, but it’s a crucial step that ensures the slab meets safety and quality standards.
Clearing and Measuring the Area
Once permits are secured, the next step is clearing and measuring the site. Measure from the lot line to position the slab properly and ensure it’s parallel to existing structures like doors or walls. Remove any debris, vegetation, or large rocks that could interfere with the installation process. Mark the corners of the slab by driving stakes into the ground, ensuring the area is level and square. This layout step is critical in creating a smooth, even foundation for the concrete slab.
Ground Preparation and Forming
Compacting the Soil and Adding Gravel
Proper ground preparation is essential to ensure the longevity of a concrete slab. Begin by compacting the soil underneath the slab area. A well-compacted base prevents stress cracks and shifting over time, providing a stable foundation. Loose or uneven soil can lead to slab failure, so using a plate compactor to firmly compress the ground is crucial.
After compacting the soil, add a layer of gravel. This not only promotes proper drainage, preventing water from accumulating beneath the slab, but it also helps in erosion prevention, which can weaken the foundation. A gravel bed, usually 4-6 inches thick, acts as a cushion that further stabilizes the concrete slab installation.
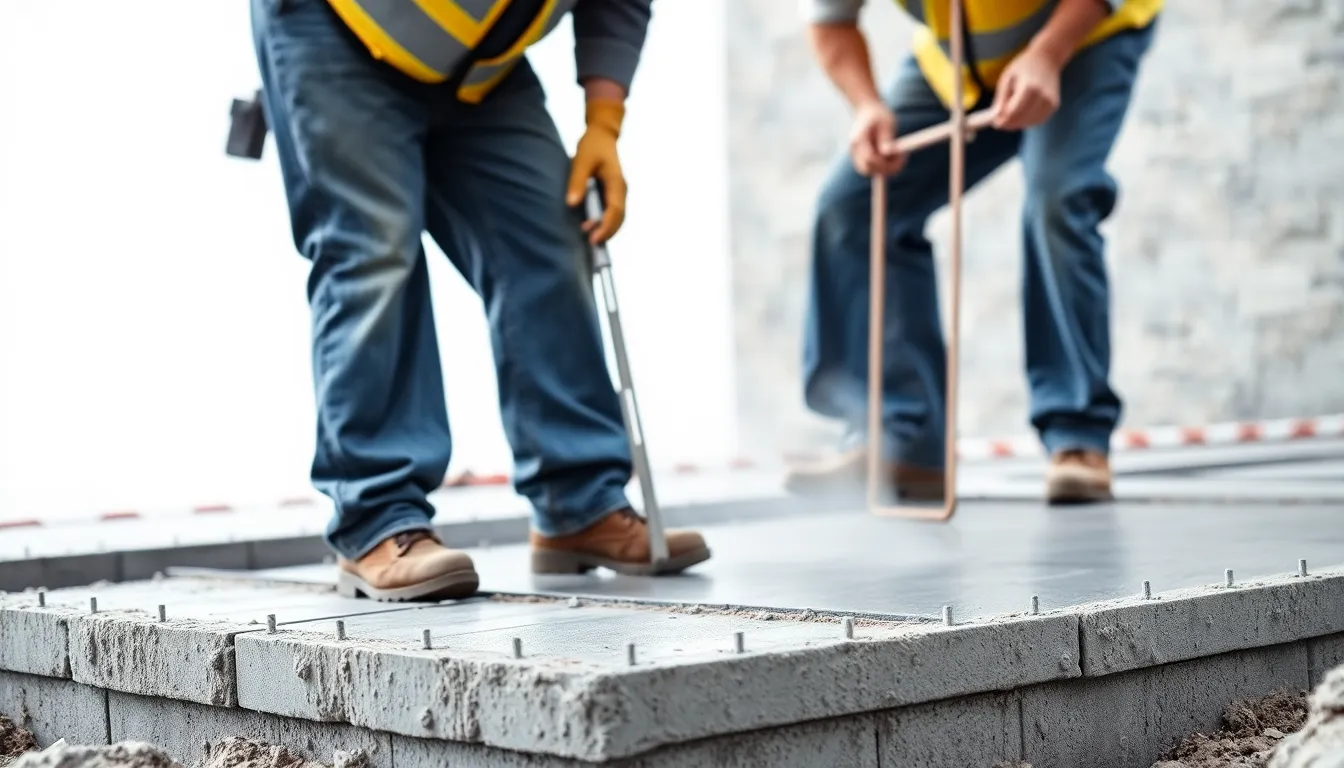
Installing the Forms
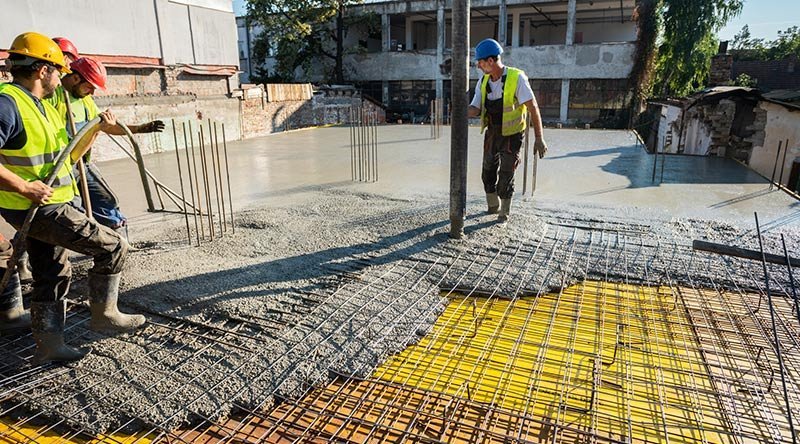
Once the gravel is laid, it’s time to install the forms, which will define the slab’s shape and size. Concrete nails are used to secure the forms in place, ensuring they don’t shift during the pour. To prevent the concrete from sticking to the forms, apply a nonslip surface or oil. This step ensures that, once removed, the forms leave clean edges. Finally, check that the forms are perfectly level, as any tilt or unevenness will affect the smoothness of the final concrete surface.
Pouring and Finishing the Concrete Slab
Pouring the Concrete
When pouring the concrete, ensure the mix is consistent and that it’s spread evenly across the forms. Start at one corner and work your way to the other side, continuously filling and compacting as you go. Using a level is critical throughout this process to make sure the concrete is even and smooth. Uneven areas can lead to weak spots that may crack over time, especially if the slab will experience heavy loads.
Filling the slab uniformly also prevents air pockets from forming beneath the surface, which could cause the slab to break under pressure. Make sure the concrete reaches the desired thickness, typically 4-6 inches depending on the intended use, and is spread evenly throughout the forms.
Using a Bull Float for Smooth Finishing
After the concrete is poured, the next step is to smooth the surface using a bull float. This tool helps to flatten the slab and push any trapped air or excess water to the surface. By removing these air pockets, you create a dense, strong slab that is less likely to develop cracks. The bull float should be moved in a back-and-forth motion, keeping the surface flat and uniform.
Smoothing Edges and Adding Finishing Touches
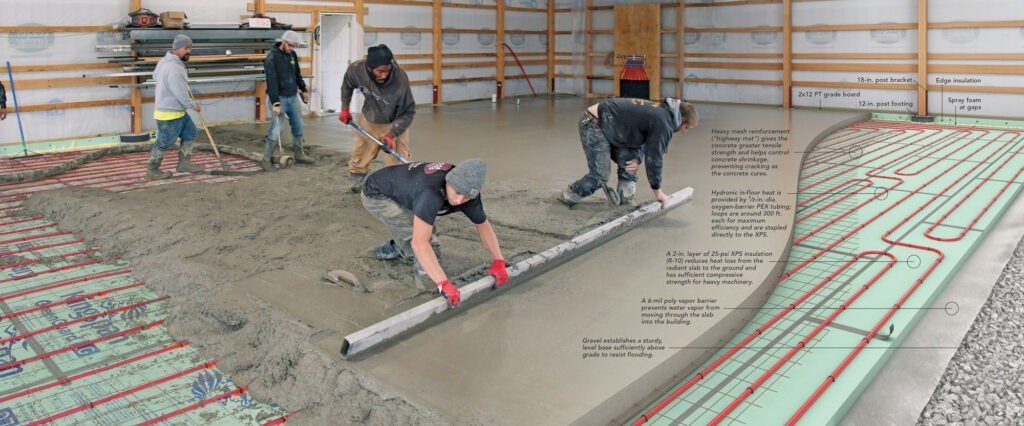
Once the slab is leveled, focus on the edges. Use an edging tool to round off the slab edges, which helps prevent future cracks and chipping as the slab expands and contracts with temperature changes. If you’re incorporating a radiant heat system within the slab, now is the time to install it, ensuring it’s properly embedded in the concrete without affecting the slab’s thickness or finish. Finally, let the slab cure properly for a strong, durable finish.
Determining Concrete Slab Thickness and Reinforcement
Choosing the Correct Thickness
The thickness of a concrete slab plays a crucial role in determining its durability and load-bearing capacity. For light-duty applications, such as walkways or patios, a standard slab thickness of 4 inches is typically sufficient. However, if you’re installing a slab for a deck or patio that will support heavier structures or furniture, a thickness of 5-6 inches is recommended to ensure longevity and stability.
For areas subjected to heavy foot traffic or vehicle loads, such as driveways or garages, increasing the slab thickness to at least 6 inches is essential. Proper assessment of the slab’s intended use will help you choose the appropriate thickness, ensuring that it can handle the expected load without cracking or shifting.
Reinforcing the Slab with Rebar
To further enhance the strength of the concrete slab, adding rebar is a standard reinforcement technique. Rebar helps distribute weight across the slab, reducing the likelihood of cracks caused by heavy loads or soil movement. Install the rebar grid evenly, following the spacing and tying methods recommended by the manufacturer’s instructions. For most residential applications, placing the rebar in a 12-18 inch grid pattern is sufficient. Securely tie the rebar to prevent shifting during the pour, ensuring that it sits slightly above the base of the slab for optimal support.
Installing Concrete Slabs for Different Uses
Concrete Slab for Patios and Decks
When installing a concrete slab for a patio or deck, it’s important to ensure the slab is thick enough to support the weight of the structure. For patios, a 4-6 inch slab typically works well, but for decks, especially those designed for outdoor furniture and heavy foot traffic, the slab should be at least 6 inches thick. Additionally, consider applying a nonslip surface to the slab to improve safety, especially in areas prone to rain or wet conditions, like around pools.
Concrete Slab for Wood Flooring
For wood flooring installations over a concrete slab, moisture control is a top priority. Concrete naturally absorbs moisture, which can be damaging to wood over time. Before installing wood floors, make sure the slab is fully cured and dry. Use a moisture barrier, such as plastic sheeting or a vapor barrier, to prevent moisture from seeping up through the concrete and affecting the wood flooring. Proper moisture control is key to preventing warping or rot, ensuring a long-lasting wood floor installation over the concrete slab.
Radiant Heat Concrete Slabs
Radiant heat systems are an increasingly popular option for concrete slab installations, especially in colder climates. To install radiant heat, the heating elements or water tubing must be laid out within the slab before pouring the concrete. This setup provides winter warmth by heating the slab from within. Be sure to adjust the slab thickness accordingly, typically requiring an additional inch of concrete to protect the heating system. The even distribution of heat also helps reduce energy costs while providing a comfortable living space during colder months.
Ensuring a Long-Lasting Concrete Slab Installation
A successful concrete slab installation requires careful preparation, proper thickness, and reinforcement. Regular maintenance—such as sealing and repairing minor cracks—ensures the slab’s durability and extends its lifespan. By following these best practices, your concrete slab will remain stable, attractive, and functional for years to come. Taking the time to prepare the site and reinforce the slab will ultimately save you time and money in future repairs.
Call to Action
Ensure your concrete slab installation is done right the first time by partnering with a professional. Whether you’re installing a patio, wood flooring, or incorporating a radiant heat system, proper preparation and maintenance are key to long-lasting results. For high-quality materials and expert installation, trust RJT Construction, a top industrial concrete company in Houston.
Contact us today for a consultation and get started on your next concrete project with confidence. Let our expertise provide you with a durable, reliable concrete foundation built to last!
How Much Does Concrete Slab Installation Cost in Houston?
One of the first questions property owners ask when planning a concrete slab installation project is how much it will cost. In Houston, pricing varies significantly based on slab type, thickness, square footage, reinforcement method, and site conditions. Understanding what drives cost helps you budget accurately and avoid surprises during your construction project.
Typical Price Ranges for Concrete Slabs in Houston
- Basic residential slab (4 inches thick): $4 to $8 per square foot
- Reinforced residential or light commercial slab: $6 to $12 per square foot
- Post-tension slab (common in Houston due to clay soils): $8 to $14 per square foot
- Heavy commercial or industrial slab: $10 to $20+ per square foot
- Decorative or specialty concrete finishes: Add $2 to $10 per square foot
What Factors Affect Your Total Project Cost?
Beyond material and labor, several Houston-specific variables can affect the final cost of your concrete slab project:
- Site preparation and excavation: Rocky or highly expansive clay soil may require additional grading, compaction, or moisture conditioning before pouring begins. Visit our Site Work page to learn more about how we handle Houston’s challenging soil conditions.
- Rebar vs. wire mesh vs. post-tension cables: Each reinforcement method carries a different material and labor cost, with post-tensioning typically being the most expensive upfront but offering long-term performance benefits.
- Permitting fees: Houston and surrounding municipalities charge permitting fees that vary by jurisdiction and project scope.
- Concrete mix design: Higher PSI mixes or fiber-reinforced concrete cost more but are often recommended for commercial applications or heavy load environments.
- Access and logistics: Tight job sites, limited concrete truck access, or remote locations in the greater Houston area may add to delivery and labor costs.
For an accurate estimate tailored to your specific project, contact our team at (832) 979-4175 or explore our Concrete Services page. RJT Construction provides detailed, transparent quotes for both residential and commercial concrete slab installation throughout Houston, Texas.
Houston-Specific Considerations: Soil Conditions, Climate, and Expansive Clay
Installing concrete slabs in Houston comes with a unique set of challenges that contractors in other regions simply don’t face. Experienced local professionals understand that ignoring these conditions leads to cracked foundations, differential settlement, and costly repairs down the road.
Houston’s Expansive Clay Soil Problem
Much of the Houston metro area sits on highly expansive clay soils, often referred to as “Beaumont Clay” or “Houston Black Clay.” This soil type shrinks significantly during dry periods and swells dramatically when wet — sometimes exerting thousands of pounds of pressure per square foot against a slab or foundation. Without proper mitigation, this movement causes cracking, heaving, and structural failure over time.
Effective strategies for managing expansive clay beneath your concrete slab include:
- Moisture conditioning: Pre-wetting the subgrade before placement to bring clay to a stable moisture content
- Lime stabilization: Mixing lime into the top layer of clay soil to reduce its plasticity and expansion potential
- Deep compaction and fill: Removing poor-performing surface soils and replacing with engineered fill
- Proper drainage design: Grading the site so water moves away from the slab perimeter consistently
Houston’s Heat, Humidity, and Rainfall
Houston’s climate is demanding for concrete work. Summer temperatures regularly exceed 95°F, accelerating the curing process and increasing the risk of surface cracking if concrete isn’t properly protected. High humidity can also affect finishing windows and curing rates. Our contractors schedule pours strategically, use evaporation retarders when necessary, and apply proper curing compounds to protect fresh slabs from Texas heat.
Heavy rainfall events — which Houston experiences frequently — pose another challenge. A slab poured on saturated or improperly drained soil is at risk of settlement. This makes site work and drainage planning an essential first step in any concrete slab installation project. Learn how our team approaches site preparation at our Site Work page.
Types of Concrete Slabs Used in Houston Construction
Not all concrete slabs are the same. Choosing the right slab type for your Houston project depends on soil conditions, structural loads, building type, and budget. Here’s a breakdown of the most common types used in both residential and commercial construction across the region.
Post-Tension Slabs
Post-tension slabs are by far the most common foundation slab type in Houston, and for good reason. High-strength steel cables — called tendons — are run through the concrete before it cures, then tensioned after the concrete reaches adequate strength. This method compresses the slab internally, dramatically improving its resistance to the movement caused by Houston’s expansive clay soils. Post-tension slabs are used in the vast majority of new residential and light commercial construction in the greater Houston area.
Monolithic Slabs
A monolithic slab is poured as a single unit, with the footing and floor slab formed and poured simultaneously. This approach is faster, more economical, and works well in stable soil conditions or on engineered fill. It’s commonly used for accessory structures, outbuildings, and smaller commercial projects where soil conditions have been verified to be suitable.
Stem Wall (Raised) Slabs
Stem wall slabs use a separately poured perimeter wall that supports a floor slab above grade level. This design allows for better drainage, easier access to utilities, and is often specified when the site has significant grade changes or flood risk — a relevant concern in many Houston-area neighborhoods. The added height also reduces soil moisture impact on the slab over time.
Floating Slabs
Floating slabs rest on top of the ground rather than being anchored to a deep perimeter footing. They’re commonly used for garages, sheds, and warehouse floors where the slab carries its own load but is not supporting a structural wall system. In Houston, proper subgrade preparation is especially critical for floating slabs given the expansive soil conditions. Our Concrete Services team can evaluate which slab type is right for your specific project.
Permits and Local Building Codes for Houston Concrete Work
Most concrete slab installation projects in Houston and surrounding municipalities require permits, particularly when the slab serves as a building foundation or supports a structure. Skipping this step can result in stop-work orders, fines, and required demolition of unpermitted work.
What Typically Requires a Permit?
- Foundation slabs for new residential or commercial buildings
- Slab additions or extensions to existing structures
- Concrete work within flood zones or special hazard areas
- Any slab supporting occupied space
The City of Houston operates under the International Building Code (IBC) and has specific requirements for slab thickness, reinforcement, drainage, and inspection milestones. Harris County and surrounding municipalities — including Sugar Land, Pearland, Katy, and The Woodlands — each have their own permitting offices and may have additional local amendments. As your general contractor, RJT Construction handles permit acquisition and coordinates all required inspections as part of our project management process. Learn more about our full-scope capabilities at our General Contracting page.
Timeline: What to Expect from Start to Finish
Understanding the timeline for a concrete slab installation project in Houston helps you plan your broader construction schedule accurately. While every project is different, here’s a general sequence of events:
- Week 1-2 — Site evaluation and design: Soil testing, engineering review, and project design are completed. Permit applications are submitted.
- Week 2-4 — Permitting: Houston-area permit processing times vary. Simple projects may be approved in days; complex commercial projects may take several weeks.
- Week 4-5 — Site preparation: Excavation, grading, subgrade compaction, utility rough-ins, and drainage preparation are completed.
- Week 5-6 — Forming and reinforcement: Forms are set, rebar or post-tension cables are placed, and the pour is scheduled.
- Pour Day: Concrete is placed, consolidated, leveled, and finished in a single day for most projects.
- Curing period (7-28 days): Concrete must cure before loading. Post-tension slabs require tensioning after approximately 7 days of curing.
For larger commercial projects, phased pours and extended timelines may apply. Visit our commercial concrete contractors in Houston page to explore slabs, paving, foundations, parking lots, sidewalks, repairs, and site work.
Maintenance Tips for Houston’s Heat and Humidity
A properly installed concrete slab in Houston can last 30 to 50 years or more — but only with appropriate maintenance that accounts for the local climate.
- Seal the surface every 2-3 years: A quality penetrating sealer protects against moisture intrusion, UV damage, and chemical spills — all common in Houston’s humid, hot environment.
- Maintain consistent moisture around the foundation perimeter: During dry spells, use a soaker hose around the perimeter of your slab to prevent extreme clay shrinkage and differential settlement.
- Keep drains clear and gutters functional: Ensure water is always directed away from your slab. Standing water against a slab promotes soil erosion and clay expansion cycles.
- Address cracks early: Small hairline cracks are normal but should be sealed promptly to prevent moisture infiltration and widening over time.
- Avoid heavy point loads on residential slabs: Parking heavy equipment or placing concentrated loads on slabs not designed for that purpose accelerates wear and cracking.
- Inspect annually: A quick walk-around inspection each year — looking for new cracks, uneven sections, or drainage issues — can catch problems before they become expensive repairs.
Frequently Asked Questions About Concrete Slab Installation in Houston
How thick should a concrete slab be in Houston?
For residential foundations in Houston, 4 to 6 inches is standard, with thicker beams at the perimeter and interior beam grid for post-tension systems. Commercial slabs often range from 6 to 12 inches or more depending on load requirements. Soil conditions and structural engineering specifications ultimately determine the appropriate thickness for your specific project.
Do I need a post-tension slab in Houston?
In most cases, yes. Houston’s expansive clay soils make post-tension slabs the preferred choice for residential and light commercial foundations because the internal cable tension helps the slab resist the movement caused by soil shrinking and swelling. Your structural engineer and contractor will confirm the appropriate system based on your site’s geotechnical report.
How long does concrete take to cure in Houston’s heat?
Concrete reaches structural strength in approximately 28 days, but in Houston’s summer heat, surface curing can be accelerated — which sounds beneficial but actually increases cracking risk if not managed properly. Experienced contractors use curing compounds, wet burlap, or plastic sheeting to slow moisture loss and ensure uniform curing, especially during hot Texas summers.
Can I pour a concrete slab in the rain in Houston?
Pouring concrete in active rain is not recommended, as rainwater dilutes the concrete mix and weakens the surface. However, Houston’s unpredictable weather means contractors must monitor forecasts closely and be prepared to adjust schedules. Light rain after a pour — once the surface has set enough — is generally manageable with proper protection in place.
How do I find a reliable concrete slab contractor in Houston?
Look for a licensed, insured contractor with demonstrated experience in Houston specifically — not just general concrete experience. Local knowledge of soil conditions, permit processes, and climate considerations is essential. Ask for references, verify licensing with the Texas Department of Licensing and Regulation (TDLR), and request a detailed written proposal before signing any agreement. RJT Construction has extensive experience with concrete slab installation projects across Houston and the surrounding region, from custom residential builds to large-scale commercial construction.
Ready to Start Your Concrete Slab Project in Houston?
Whether you’re planning a new foundation, an industrial floor, a commercial expansion, or a custom residential construction project, RJT Construction brings the local expertise, professional crews, and project management capabilities to get it done right — on time and within budget. We handle everything from Site Work and permitting to finishing and sealing, so you have one trusted partner throughout the entire process.
Explore our full range of services including Concrete Services, Commercial Construction, General Contracting, and Custom Builds. When you’re ready to move forward, our team is standing by to answer your questions and schedule a site evaluation.
Call RJT Construction today at (832) 979-4175 to discuss your concrete slab installation project in Houston, Texas. Let’s build something that lasts.