Standing seam metal roofs have become an increasingly popular choice for homeowners in Texas due to their exceptional durability, energy efficiency, and ability to withstand harsh weather conditions. Unlike traditional asphalt shingle roofs, standing seam metal roofs offer a sleek, modern aesthetic while providing long-term protection for your home. Their resistance to wind, fire, and water damage makes them particularly well-suited for the Texas climate, where extreme weather is common.
At RJT Construction, we specialize in professional metal roof installation, ensuring that your standing seam roof is installed to the highest standards, delivering both reliability and style for your home.
Understanding Standing Seam Metal Roofs
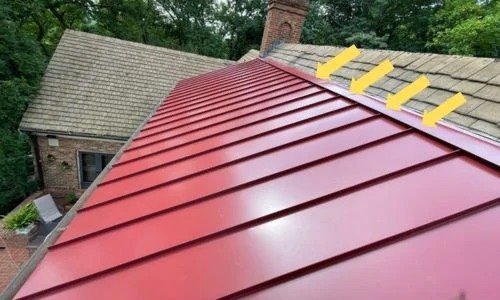
A standing seam metal roof is a popular option because it looks modern and works very well. Its key feature is the raised seams where metal panels connect. These seams create nice vertical lines that make any building more attractive. They also help direct water away from the roof, which prevents potential leaks.
This roofing system is made of interlocking metal panels that attach to the roof deck with hidden fasteners. Unlike regular asphalt shingle roofs, the fasteners are tucked away under the panels. This gives the roof a clean look and boosts its ability to resist bad weather.
The Basics of Standing Seam Metal Roofing
Before we talk about how to install seam metal roofs, let’s learn what they are. A seam metal roof is made up of metal panels that fit together at the seams. This creates raised lines that help the roof shed water easily. This special design not only looks good but also makes the roof strong and long-lasting.
The main part of a standing seam roof is the roof deck. This deck is the base that holds everything up. It is usually made from plywood or oriented strand board (OSB). The roof deck gives a stable place to attach the underlayment, panels, and other parts.
Another important feature of standing seam roofs is that they use hidden fasteners. These fasteners are not visible because they are under the panels. This keeps them safe from bad weather and keeps the roof looking clean and smart.
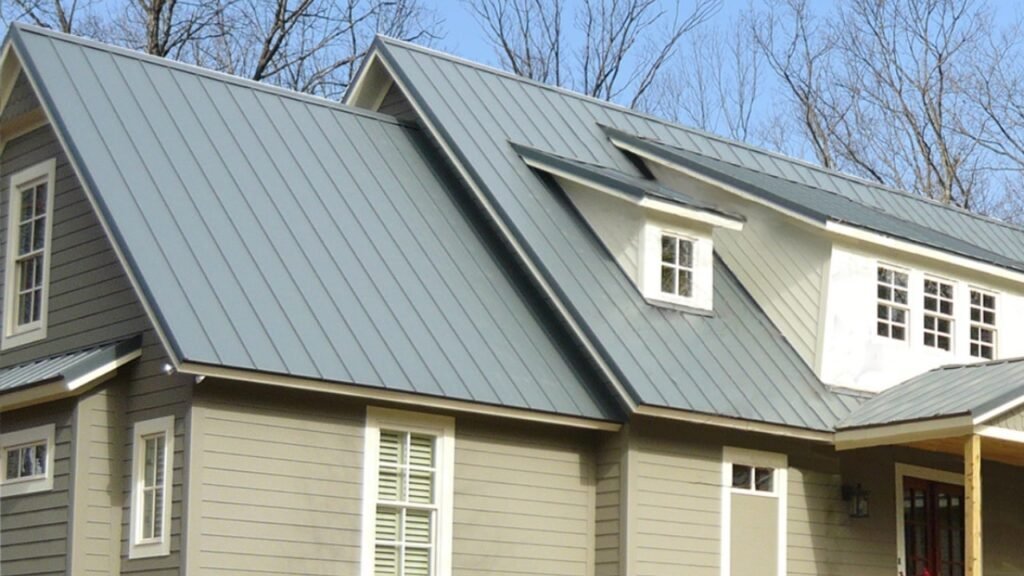
Benefits of Choosing a Standing Seam Metal Roof for Your Texas Home
Standing seam metal roofs are very popular in Texas for many good reasons. Homeowners are starting to see the many benefits these roofs provide, making them a smart choice for any home.
Durability is one main reason people like standing seam metal roofs. They are built to handle tough weather. They protect well against heavy rain, strong winds, and hail. Here are some great reasons why homeowners choose standing seam metal roofs:
- Exceptional Durability: Standing seam metal roofs last a long time, often over 50 years, longer than regular roofing options.
- Energy Efficiency: The metal panels help save energy by reflecting solar heat, which lowers energy use.
- Enhanced Curb Appeal: These roofs make any home look better and add a touch of modern style.
Preparing for Your Standing Seam Metal Roof Installation
Before starting the installation process, it’s important to prepare well. This means collecting all the tools and materials you need. You should also check that your roof is in good shape for the new system.
Having everything, from safety gear to special roofing tools, close at hand will help the installation go smoothly and avoid delays.
Tools and Materials Required for Installation
Gathering all the tools and materials you need is very important for an easy and efficient installation. This means getting everything from basic hand tools to special roofing equipment. Choosing high-quality materials will also help your standing seam metal roof last longer and perform better.
A cordless drill is essential. It helps you drive in fasteners and hold the metal panels in place. Synthetic underlayment, especially a high-heat ice and water shield, protects against moisture and stops damage from ice dams.
Here is a list of tools and materials you will need:
| Tool/Material | Description |
| Cordless Drill | Used for driving fasteners |
| Synthetic Underlayment | Provides extra protection against moisture |
| Fasteners | Used to attach metal panels to the roof deck |
Measuring Your Roof Accurately
Accurate measurements are key for a good standing seam metal roof installation. Wrong measurements can cause big problems, such as panels that don’t fit, wasted materials, and possible leaks. That’s why you should take the time to measure your roof decking correctly.
Start by measuring the length and width of each part of the roof. If your roof has a complex design, break it down into smaller sections. This will make measuring easier. Write down all your measurements clearly to avoid mistakes.
Good measurements ensure the metal panels fit well. Also, they help you figure out exactly how much material you need. This can reduce waste and keep your budget in check.
Step-by-Step Guide to Installing a Standing Seam Metal Roof
Now, let’s look at a simple step-by-step guide for putting up your standing seam metal roof. This guide gives a basic view of the process. It’s good to remember that installing a metal roof can be complicated. It’s usually best to have experienced roofing contractors do the work. They have the skill, knowledge, and special tools to manage the details that come with the installation process.
Still, knowing the steps can help you talk better with contractors. This way, you can make sure the job is done right.
Step 1: Removing Existing Roofing Material
The first step in installing your new roof is to take off the old roofing material. If you have an asphalt shingle roof, workers will carefully remove the old shingles to show the roof deck. It is important to dispose of the old roofing materials properly. You might need to rent a dumpster or use a hauling service.
Next, check the roof deck for any damage before installing the new standing seam metal roof. Look for rotting wood, loose boards, or other structural issues. If you find any damage, you should repair or replace those parts. This will make sure your new roof has a strong base.
This step is very important. It helps your new roof last longer and stay strong. A damaged roof deck can hurt the stability of the whole roofing system.
Step 2: Installing Underlayment for Enhanced Protection
With a clean and fixed roof deck, the next step is to add a layer of synthetic roofing underlayment. This layer is very important because it protects your home from moisture and potential leaks. Good quality synthetic underlayment is specially made for metal roofs. It is durable and can resist water well.
You need to roll out the underlayment carefully over the roof deck. Make sure it covers everything and overlaps at the seams. It is vital to follow the manufacturer’s guidance on how to overlap it to keep water from coming in.
This extra layer is especially important if you live in areas that see a lot of rain or large changes in temperature.
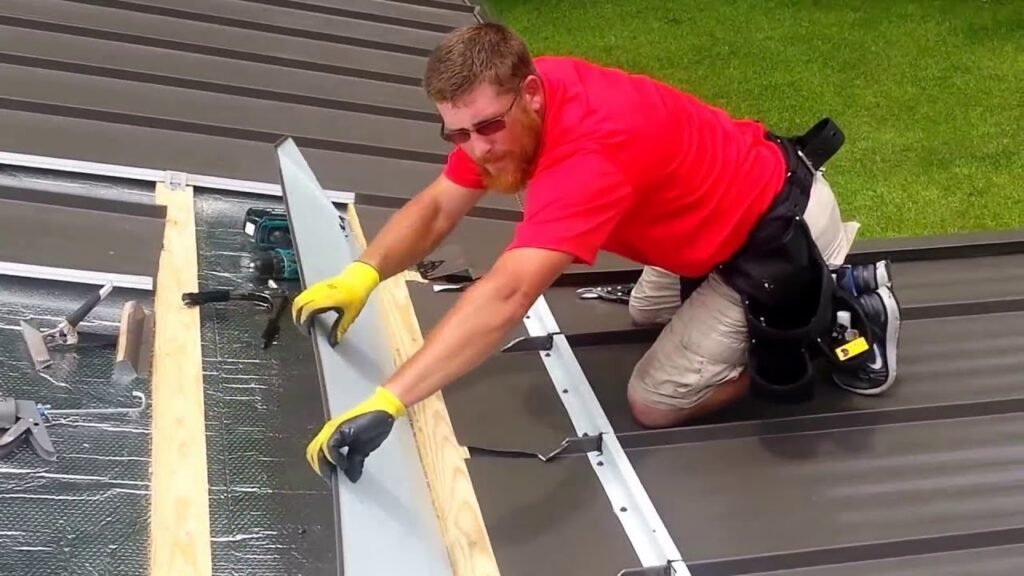
Step 3: Laying Out and Attaching the Metal Panels
With the underlayment in place, it’s time to work on the metal panels. Laying out and attaching these panels is a detailed job that needs a lot of care.
The installation usually starts at one end of the roof. The first panel is aligned carefully to make sure it’s straight and fits well at the edge. It’s important to pay close attention to the overhangs and eaves. This helps create a nice look and keeps the area weatherproof.
Each metal panel is lifted and placed carefully. This ensures it lines up correctly with the next panel. Fasteners are then added through the metal panel and into the roof deck. This keeps it secure.
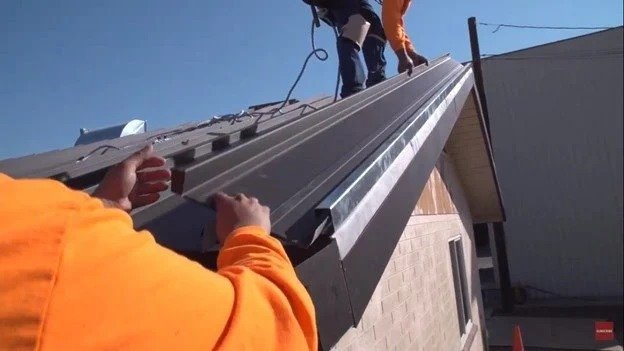
Step 4: Securing Panels with Lock Strips and Seams
Standing seam metal roofs are known for their hidden fastener system. This system improves how they look and helps them resist bad weather. Lock strips are important for this smooth appearance. They are put along the roof’s edges and valleys, securing the metal panels in place.
The seams where two metal panels meet are another key part of standing seam roofs. These raised seams form channels that direct water away from the roof. This keeps it from leaking and helps it work well.
To make the roof even more weatherproof, sealant tape or butyl tape is added along the seams before the panels fit together.
Step 5: Applying Finishing Touches like Ridge Caps and Trim
As the installation of your new roof is almost done, it’s time to add the final touches. These touches will improve how the roof looks and works. Ridge caps are metal pieces placed at the peak of the roof. They are measured and put in place carefully to give the roof a neat and finished appearance.
Trim pieces are added around chimneys, vents, and other areas on the roof. This helps keep water out and makes everything look clean. These final touches not only make your new roof look nicer but also help it perform well over time.
By taking care of these details, you make sure your new roof looks great and is strong enough to handle different weather conditions for many years.

Conclusion
In conclusion, installing a standing seam metal roof involves several key steps: from removing old roofing materials, preparing the roof deck, to carefully installing the metal panels and securing them with lock strips. Each stage is essential to ensuring the roof’s durability and weather resistance.
Choosing RJT Construction for your standing seam metal roof installation guarantees expert craftsmanship and attention to detail, giving you peace of mind knowing your home is protected for years to come. If you’re looking to upgrade your home with a durable, energy-efficient, and low-maintenance roofing solution, consider a standing seam metal roof. Contact RJT Construction today to get started on your roofing project!
Frequently Asked Questions
What is the Ideal Slope for a Standing Seam Metal Roof in Texas?
The best slope for a standing seam metal roof in Texas, and elsewhere, is usually at least 2:12. This means that for every 12 inches of the roof that runs horizontally, it should rise 2 inches vertically. However, even roofs with a low slope can do well with standing seam metal roofing if they are designed and installed correctly.
How Long Does a Standing Seam Metal Roof Last?
Standing seam metal roofs are known for being very durable. They can last 50 years or even longer with just a little maintenance. This long lifespan, along with their many benefits, makes them a smart and long-lasting choice for homeowners.
Standing Seam Metal Roof Installation Guide: Everything Houston Property Owners Need to Know
If you are a homeowner or commercial property owner in Houston exploring roofing upgrades, standing seam metal roofing consistently rises to the top of the list. Durable, energy-efficient, and visually striking, a standing seam metal roof is one of the most significant long-term investments you can make in your property. At RJT Construction, we have installed, repaired, and maintained metal roofs across the Greater Houston area for years, and we have put together this comprehensive installation guide to answer every question you might have before you commit to a project.
From understanding what makes standing seam metal roofing different from other systems to breaking down installation costs per square foot, this guide covers it all. Ready to get started? Call us at (832) 979-4175 or explore our full range of roofing services to learn more.
1. What Is a Standing Seam Metal Roof? Components and Terminology
A standing seam metal roof is a continuous metal roofing system where the panels are connected by raised seams that interlock vertically above the flat surface of the roof. Unlike traditional roofing systems where fasteners are exposed to the elements, standing seam designs conceal all mechanical fasteners beneath the panels or within the seam itself. This design dramatically reduces the risk of leaks and weather-related damage over the life of the roof.
Understanding the core components and terminology will help you communicate more effectively with your contractor and make informed decisions throughout the installation process.
Key Components of a Standing Seam Metal Roof System
- Panels: The individual metal sheets that form the visible surface of the roof. The panels run vertically from the ridge to the eave and are available in various widths, typically ranging from 12 to 18 inches.
- Standing Seams: The raised interlocking edges where two adjacent panels meet. Seams typically stand 1 to 2.5 inches above the panel surface. The seams are what give this roofing system its name and its waterproof advantage.
- Clips and Hidden Fasteners: Metal clips attach the panels to the roof deck without penetrating the panel surface itself, allowing thermal expansion and contraction while keeping your roof watertight.
- Underlayment: A layer of synthetic or felt material installed beneath the metal panels to provide an added moisture barrier and improve energy efficiency.
- Ridge Cap: The metal piece that covers the peak of the roof where two slopes meet, providing a clean, weather-resistant finish.
- Eave Trim and Flashings: Metal components used at the edges, valleys, walls, and penetrations (such as skylights and vents) to seal transitions and prevent water intrusion.
- Roof Deck: The structural substrate—usually plywood or oriented strand board (OSB)—to which the metal roofing system is attached.
- Sealant and Butyl Tape: Used at seams and penetrations to provide additional waterproofing where needed.
Knowing these terms will help you have a more productive conversation with the team at RJT Construction when planning your installation. Visit our roofing page for more details on the systems we offer.
2. Step-by-Step Standing Seam Metal Roof Installation Process
Installing a standing seam metal roof is a multi-phase process that requires precision, the right tools, and experienced hands. Here is a detailed walkthrough of how our team at RJT Construction approaches every standing seam metal roof installation in Houston.
Step 1: Roof Inspection and Assessment
Before any material is ordered or any work begins, we perform a comprehensive roof inspection of your existing structure. This inspection identifies any damage, rot, or structural weaknesses that need to be addressed before installation. We assess slope, drainage patterns, and load-bearing capacity to ensure the new metal roofing system is properly matched to your building.
Step 2: Measurements and Material Ordering
Accurate measurements are critical when working with standing seam metal roofing. Our team calculates the exact square footage needed for the panels, trim pieces, flashings, and underlayment. We work with trusted metal roofing suppliers to source the correct panel width, gauge, and finish for your project.
Step 3: Removing the Old Roofing Material (When Applicable)
In most cases, we remove existing roofing materials down to the roof deck. This allows us to inspect the deck for soft spots, water damage, or structural concerns. Any damaged decking is replaced at this stage to ensure a solid foundation for the new metal roof.
Step 4: Installing the Underlayment
A high-quality synthetic underlayment is installed across the entire roof deck. This layer acts as a secondary moisture barrier and also helps with energy efficiency by reducing heat transfer into the building interior. In Houston, where heat and humidity are significant factors, proper underlayment selection is essential.
Step 5: Installing Eave Trim and Starter Clips
Eave trim is installed along the lower edge of the roof to provide a clean, finished appearance and direct water into the gutters. Starter clips are then positioned along the eave to secure the first row of panels.
Step 6: Installing the Standing Seam Panels
This is the most labor-intensive phase of the installation. The panels are installed one at a time, beginning at one end of the roof and working systematically across. Each panel is secured using hidden clips that are fastened to the roof deck, and the panel edges are snapped or mechanically seamed together using a specialized seaming tool. This process creates the distinctive raised seams that define this roofing style.
Step 7: Installing Ridge Caps, Flashings, and Trim
Once all the panels are in place, our installers complete the roof by adding ridge caps at the peak, installing flashings at all transitions, penetrations, and walls, and finishing all edges with appropriate trim. These details are critical to the long-term waterproofing performance of the system.
Step 8: Final Inspection and Cleanup
Our team conducts a thorough final inspection to verify that every seam is properly formed, all flashings are correctly installed, and no fasteners have been left exposed. We also clean up the job site and safely dispose of all old roofing materials and debris.
3. Standing Seam vs. Exposed Fastener Metal Roofing: Which Is Better?
When exploring metal roofing, many property owners encounter two primary systems: standing seam and exposed fastener panels. Understanding the differences can help you choose the right solution for your specific needs.
Exposed Fastener Metal Roofing
In an exposed fastener system, the panels are attached directly to the roof deck using screws that penetrate through the face of the panel. The screw heads are visible from the outside and are typically covered with rubber washers to prevent leaks. While exposed fastener roofing is less expensive and faster to install, the rubber washers degrade over time due to UV exposure and Houston’s intense heat, creating potential leak points. The fasteners themselves can also back out over time due to thermal expansion and contraction.
Standing Seam Metal Roofing
With standing seam metal roofing, no fasteners penetrate the panel surface. Hidden clips allow the panels to float and move with temperature changes without creating gaps or backing out. The seams lock panels together and shed water efficiently. This system offers superior leak resistance, a longer lifespan, and better aesthetics, making it the preferred choice for residential and commercial applications where performance is the priority.
The Verdict
For most Houston applications, especially commercial buildings and premium residential properties, standing seam metal roofing is the better long-term investment. The higher upfront cost is offset by reduced maintenance, fewer roof repairs, and a significantly longer service life. Learn more about our roof and building repair services if your current metal roof needs attention before you decide on a full replacement.
4. Cost of Standing Seam Metal Roof Installation (Per Sq Ft)
One of the most common questions we receive is: how much does a standing seam metal roof cost? The answer depends on several factors, but here is a general breakdown to help you plan your budget.
Average Cost Ranges in Houston, TX
- Galvanized Steel Standing Seam: $8 to $14 per square foot installed
- Galvalume Steel Standing Seam: $9 to $15 per square foot installed
- Aluminum Standing Seam: $10 to $17 per square foot installed
- Zinc Standing Seam: $15 to $25 per square foot installed
- Copper Standing Seam: $25 to $40+ per square foot installed
Factors That Influence Cost
- Roof pitch and complexity: Steeper or more complex roof designs require more labor and safety equipment.
- Panel width and gauge: Thicker gauge materials cost more but offer better durability and longevity.
- Roof size: Larger roofs may benefit from economies of scale, while smaller projects may have higher per-square-foot costs.
- Underlayment and insulation: Premium underlayment and insulation products add to the overall cost but improve energy efficiency.
- Removal of existing roofing: If tear-off and disposal are required, this adds to the project cost.
- Local labor rates: Houston-area labor costs are factored into every estimate we provide.
For a precise quote tailored to your property, contact RJT Construction at (832) 979-4175. We offer transparent, detailed estimates with no hidden fees.
5. Best Standing Seam Metal Roof Materials: Steel, Aluminum, Copper, and Zinc
Not all metal roofing materials are created equal. Each metal type has distinct properties that make it better suited to certain applications, budgets, and environmental conditions. Here is a detailed look at the most popular options for standing seam metal roofing in Houston.
Galvanized and Galvalume Steel
Steel is the most widely used material in metal roofing. Galvanized steel is coated with a layer of zinc to resist corrosion, while Galvalume steel uses an aluminum-zinc alloy coating for even greater corrosion resistance. Steel panels are strong, relatively affordable, and available in a wide range of colors and finishes. For most Houston commercial and residential applications, Galvalume steel is an excellent all-around choice that balances cost and performance.
Aluminum
Aluminum standing seam metal roofing is naturally resistant to corrosion, making it an excellent choice for coastal areas and high-humidity environments like Houston. Aluminum is lighter than steel, which reduces structural load, and it does not rust. The trade-off is that aluminum is softer than steel and can be more susceptible to denting. It is also slightly more expensive than steel. For coastal or waterfront properties in the Houston area, aluminum is often the preferred material.
Copper
Copper is the premium choice for standing seam metal roofing. It develops a distinctive natural patina over time that many homeowners and architects find aesthetically compelling. Copper is extremely durable, with a lifespan that can exceed 100 years, and it requires virtually no maintenance. The significant downside is cost—copper is the most expensive metal roofing option. It is most commonly used for architectural accents, historic restorations, and high-end residential projects.
Zinc
Zinc is a popular choice in Europe and is gaining traction in the United States. Like copper, zinc develops a patina that actually protects the underlying metal from corrosion. Zinc is self-healing, meaning minor scratches can repair themselves over time as the patina reforms. It is more expensive than steel and aluminum but less costly than copper, making it a compelling option for property owners seeking premium performance and aesthetics at a mid-range price point.
6. Standing Seam Metal Roof Pros and Cons for Commercial Buildings
Commercial property owners in Houston have many roofing options, but standing seam metal roofing offers a unique combination of performance, durability, and low lifecycle costs. Here is an honest look at both the advantages and limitations of this roofing system for commercial applications.
Pros
- Exceptional Longevity: A well-installed standing seam metal roof can last 40 to 70 years, far outlasting asphalt shingle or single-ply membrane roofing systems.
- Superior Weather Resistance: Houston is no stranger to severe weather, including hurricanes, heavy rain, and intense heat. The interlocking seams and hidden fasteners provide outstanding resistance to wind uplift and water infiltration.
- Energy Efficiency: Metal roofs reflect solar radiation rather than absorbing it, reducing cooling loads and lowering energy costs—a significant advantage in Houston’s long, hot summers. Many standing seam systems qualify for energy tax credits.
- Low Maintenance Requirements: Unlike built-up or single-ply membrane roofs that require regular recoating and seam maintenance, standing seam metal roofing requires minimal upkeep over its lifespan.
- Fire Resistance: Metal roofing systems carry a Class A fire rating, the highest available.
- Accommodates Thermal Movement: The hidden clip attachment system allows the panels to expand and contract freely with temperature changes, preventing buckling, oil-canning, and fastener failure.
- Aesthetic Appeal: Clean lines and a modern profile make standing seam metal roofing a premium visual choice for commercial properties.
Cons
- Higher Initial Cost: The upfront investment for standing seam metal roofing is significantly higher than alternatives like TPO or modified bitumen roofing systems.
- Noise: Rain on a metal roof can be louder than on other roofing types, though proper insulation and underlayment significantly reduce this effect.
- Specialized Installation Required: Not all roofing contractors have the experience and equipment needed to properly install standing seam metal roofing. Choosing an unqualified contractor can result in improper seaming, leaks, and voided warranties.
- Expansion and Contraction: If the system is not properly designed to allow movement, thermal cycling can eventually cause stress on the panels and fasteners.
For commercial roofing projects in Houston, RJT Construction offers expert installation backed by years of hands-on experience. Learn more about our commercial construction services.
7. How Long Does Standing Seam Metal Roof Installation Take?
One of the practical questions every property owner asks is how long they can expect the installation process to take. The timeline for a standing seam metal roof installation depends on several variables, including the size and complexity of the roof, the weather, the availability of materials, and crew size.
Typical Installation Timelines
- Small residential roof (1,000 to 1,500 sq ft): 2 to 4 days
- Medium residential roof (1,500 to 3,000 sq ft): 4 to 7 days
- Large residential or small commercial roof (3,000 to 6,000 sq ft): 7 to 14 days
- Large commercial roof (6,000+ sq ft): 2 to 6 weeks depending on complexity
Factors That Can Extend the Timeline
- Weather delays, which are common in Houston during hurricane season and heavy rain periods
- Discovery of significant deck damage during tearoff that requires repair or replacement
- Complex roof geometries with many valleys, penetrations, or architectural features
- Material lead times, particularly for specialty metals like copper or zinc
RJT Construction provides detailed project schedules during the estimation phase so you know exactly what to expect before work begins. Call (832) 979-4175 to schedule your consultation.
8. Maintenance and Lifespan of Standing Seam Metal Roofs in Houston
One of the biggest advantages of standing seam metal roofing is its low maintenance requirements compared to other roofing systems. However, some level of routine care is still important to protect your investment and maximize the lifespan of your roof, particularly given Houston’s challenging climate.
Routine Maintenance Tasks
- Annual Roof Inspection: We recommend scheduling a professional inspection at least once per year, ideally before hurricane season in the spring. A thorough inspection will identify minor issues—like sealant degradation at penetrations or minor denting from hail—before they develop into significant damage.
- Gutter Cleaning: Keeping gutters clear of debris ensures that water drains properly off your roof and does not back up under the eave trim.
- Removing Debris: Branches, leaves, and other debris that accumulate on the roof should be removed promptly to prevent moisture retention and potential surface damage.
- Checking Flashings and Sealants: Inspect flashings around chimneys, vents, and skylights periodically. Sealant at penetrations may need to be refreshed every 10 to 15 years depending on the product used.
- Addressing Surface Scratches: Minor scratches in the panel coating should be touched up with manufacturer-approved touch-up paint to prevent corrosion from developing.
Expected Lifespan in Houston
In the Houston climate—characterized by intense UV exposure, high humidity, occasional hail, and hurricane-force winds—a properly installed and maintained standing seam metal roof can realistically last 40 to 60 years or more. Steel systems with high-quality PVDF (Kynar) paint finishes are particularly well-suited to Houston’s UV environment, retaining their color and chalk resistance for decades. Aluminum systems offer an added advantage of rust immunity in coastal and high-humidity zones. Copper and zinc systems, properly maintained, can last a lifetime.
For any damage that does occur, RJT Construction offers comprehensive roof and building repair services to restore your metal roof to full performance.
9. Frequently Asked Questions About Standing Seam Metal Roof Installation
Q1: Can a standing seam metal roof be installed over an existing roof?
In some cases, yes. Standing seam metal panels can be installed over certain existing roofing materials using a system of furring strips or a structural retrofit frame. However, this approach depends on the condition of the existing roof, local building codes, and the structural capacity of the roof framing. RJT Construction always conducts a thorough inspection before recommending a retrofit installation versus a full tear-off and replacement.
Q2: Are standing seam metal roofs noisy in the rain?
This is one of the most common concerns we hear, and the honest answer is: not significantly, when properly installed. With a solid roof deck and quality underlayment beneath the metal panels, sound transmission from rain is greatly reduced. Many homeowners report that a standing seam metal roof is no noisier than a traditional asphalt shingle roof.
Q3: Do standing seam metal roofs hold up well against Houston hurricanes?
Yes. Standing seam metal roofing systems are engineered to withstand extremely high wind speeds. Many systems carry wind uplift ratings of 120 mph or higher, and premium systems can exceed 160 mph. When properly installed by an experienced contractor like RJT Construction, a standing seam metal roof provides some of the best hurricane resistance available for residential and commercial properties in the Houston area.
Q4: Will a standing seam metal roof increase my home’s value?
Absolutely. Metal roofs are consistently cited as one of the top home improvement investments in terms of return on investment. A standing seam metal roof adds significant resale value, reduces insurance premiums in many cases, and is an attractive selling point for future buyers who recognize the low lifetime maintenance costs and durability of the system.
Q5: How do I choose the right contractor for standing seam metal roof installation in Houston?
Look for a contractor with specific experience in metal roofing—not just general roofing—and one who uses proper mechanical seaming tools rather than hand-seaming. Ask for references from completed metal roofing projects and verify that the contractor is licensed and insured in Texas. At RJT Construction, we bring extensive metal roofing experience to every project and stand behind our work with comprehensive warranties.
Q6: What maintenance should I do after a major storm?
After any significant storm event, we recommend scheduling a professional roof inspection to assess for hail damage, wind-lifted panels, displaced flashings, and any debris-related damage. Catching storm damage early is critical to preventing water infiltration and protecting your building’s interior. RJT Construction provides storm damage inspections and prompt roof repairs throughout the Houston metropolitan area.
Ready to Install a Standing Seam Metal Roof in Houston? Contact RJT Construction Today
Whether you are planning a new installation, upgrading an existing roof, or in need of expert repairs, RJT Construction is Houston’s trusted partner for standing seam metal roofing. Our team has the experience, equipment, and commitment to quality that your property deserves. We serve residential and commercial customers throughout Houston and the surrounding communities.
Explore our complete roofing services, learn more about our commercial construction capabilities, or find out how we can help with roof and building repairs. When you are ready to take the next step, call us at (832) 979-4175 or fill out our online contact form to request your free estimate. Let RJT Construction deliver a standing seam metal roof that protects your property for decades to come.